Wednesday, October 30, 2013

Tiffany's Show @ Pattaya

Hello! This is another layout for my Bangkok trip. A's friend was kind enough to drive us to Pattaya for the Tiffany's Show. This is my second time watching the show, but it was a first for A.

I've decided to use Kraft paper as my base for all the Bangkok trip layouts (yes, the idea is stolen from my crafty heroine, Glitter Girl). There are 3 horizontal and 1 vertical 4x6 photos for this layout, and I took a really long time to decide on the photos placement. Other than that, I took a long time to choose the patterned papers too. I wanted something that's a bit carnival looking, i.e. colorful and maybe bold repetitive patterns? I've chosen Echo Park's Enjoy the Ride collection, colorful circles pattern. It was perfect, but the white is too eye catching, so I pulled out my favorite (and only) mist, Mustard Color Shine by Heidi Swapp and gave it a few sprays.
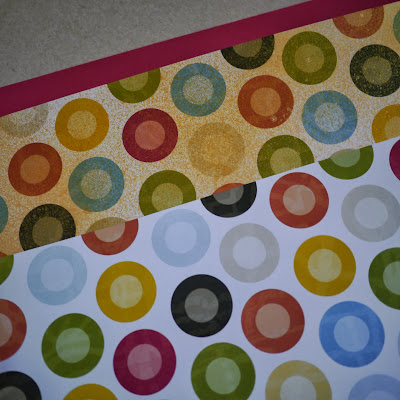
Comparison: Spray/No Spray

Tiffany's Show @ Pattaya

Glitter Thickers! Seriously, a normal non glitter Thickers wouldn't look good for this layout. And I repeated the camera accent on most of the Bangkok layouts too.

Sorry I looked a little freaked out, didn't know she was gonna hug me

Thought of skipping the journaling, but ended up having them written on the top right corner. Mental note: Next time be sure to pick a pen that's not running out of ink.


I think my layouts are getting better and better. =)

Supplies (Papers)
  • Kraft paper by Studio Calico
  • Blush Red Medium by Bazzill
  • Journaling Cards, Enjoy the Ride Collection by Echo Park
Supplies (Alphas)
  • Sparkling Glitter Thickers by American Crafts
  • Swagger & Trendsetter Sticker Fundamentals by Fancy Pants
Supplies (Embellies)
  • Doodle Dimensional Stickers by Amy Tangerine
  • Camera Accent fuzzy cut from Cameras, Enjoy the Ride Collection by Echo Park
  • Puffy Stars by Freckled Fawn
  • Candy Stripers by Queen & Co.
  • Geotag Chipboard Stickers by Studio Calico
Supplies (Others)
  • Border Starter Kit by American Crafts
  • Mustard Color Shine by Heidi Swapp

Sunday, October 27, 2013

You + Me = ♥

A simple mini album I made for A's Birthday. Hope he likes it. 

Inspired by this video, totally awesome and simple to make, and you can tailor it into whatever size you want. It's called tabbed album.

I LOVE making mini albums. They're compact, they're fun, and I just love designing different pages with different sizes. For this one, the papers are mostly from My Mind's Eye Love Me Collection. I don't usually buy lovey-dovey papers, but I still need some to capture the special moments between me and A.

The tag is from Dear Lizzy Collection & the You + Me = ♥ card is from My Mind's Eye Love Me Collection. They fit perfectly well.

♥ I'd go Everywhere with You

I ♥ this page so much, decided to let it shows.

These die cuts are from Basic Grey

Last page

Supplies (Papers)
  • My Mind's Eye, Love Me Collection: Love, Banners, Stamped & Pink Hex
Supplies (Embellishments)
  • Dear Lizzy Collection Tag by American Crafts
  • Soda Pop Fabric Stickers by American Crafts
  • Oh Yes Fabric Stickers by Amy Tangerine
  • Abbreviated Pack Picture Perfect Die Cuts by Basic Grey
  • Trendsetter Sticker Fundamentals by Fancy Pants
  • Cut Out Tags by Glitz Love You Madly Collection
  • Valentine Acetate Die Cuts by Martha Stewart Crafts
  • Chips Varnish Chipboard by Pebbles

Thursday, October 24, 2013

Sydney Take Two Mini Album

Oh my, I'm excited for my holiday! Though I'll be going to Sydney *again*, but it will be a different trip compared to the one last year, because I have plans! And there's a Paper Craft Festival that I'm looking forward to, woohooo~

I managed to get the mini album done this time, and I'm loving every bit of it! This mini album is inspired by Kathy Orta's style, chipboard covers with multiple pockets. Of course, her projects/mini albums all have multiple pages but since this is my first try, I just did a very very simple version.

So, here goes!

Sydney Take Two 2013!

How I designed the interior. Seriously loving it!

First Section without Tags

♥ First Section with All the Tags! ♥

Second Section without Tags

♥ Second Section with All the Tags! ♥

All the Tags Used in the Album!

Oh my oh my! Such a lovely mini album! Notice how the first section differs with the second? The first is much more colorful and fun style while the second is more to neutral and vintage looking style. I'm loving the musical sheet flap that holds 3 tags on the second section! Can't wait to start filling up this cute album tomorrow!

Saturday, October 19, 2013

Petite Audrey @ Siam Center

Happy Saturday everyone! 

I've started scrapping all the photos for my Bangkok trip earlier this year. I didn't take much photos so it wouldn't be as crazy as my Kyoto/Osaka trip. 7 to 8 layouts should be able to cover everything for the trip. I didn't make any mini album for this trip, because I was lazy and couldn't get it done before the trip, and of course, there's really nothing much to record. Not saying that it wasn't a fun trip, but Bangkok is really just a shopping heaven. Sightseeing, not so much. (That's just my personal opinion, maybe it's because I didn't really have a plan, A's friend was there to pick us up and kinda planned our trip for us)

This layout is about a neat little cafe we found inside the Siam Center, Petite Audrey Cafe. I was drawn to the beautiful interior design, I searched the web and other bloggers described it as a 'French Contemporary Vintage' style (and I have no idea what it means). The decors are mostly in black and white and pastel blue, which is totally cute!

I tried to create the feel of the cafe through the patterned papers I used, though I have swapped the pastel blue to pink. I used a lot of repetitive prints and birds accent to bring out my own representation of the 'French Contemporary Vintage'.
 
Patterned Paper: He Said 6x6 Paper Pad by Teresa Collins. Loving the polka dotted thickers too!

Patterned Paper: Down the Boardwalk, Gone Surfin' by We R Memory Keepers

In the pocket

Patterned Paper: Love You Madly by Glitz

Overall

This layout is actually for one of the challenges from Art+Science Scrapbook Workshop, using a Project Life pocket page for a layout. I don't have any pocket page, so I have to improvise and I used the block design of a pocket page as my 'sketch'. Since my photos are all horizontal, I picked the most basic 6 4x6 pocket page design. It does limit the amount of embellishments I could put on the page, and I think it is a great approach when I have limited embellishments that go with the page or when I'm just plain lazy to embellish. I do like this layout very much, and I'm thinking to scrap my Kyoto/Osaka trip using Project Life pocket pages, because of the amount of photos I have, and mostly with multiple photos for a single layout. All in all, I'm very happy I took on this challenge, because it certainly brought me new ideas about how I can scrapbook, especially with multiple 4x6 photos. 

How do you like my layout? 

Supplies (Base for the Layout)
  • Kraft paper by Studio Calico
Supplies (Letters)
  • Thickers by Studio Calico
  • Raspberry Tiny Alpha Stickers by Kaiser Craft
  • 4x6 Alpha Stickers by Basic Grey
Supplies (Embellies)
  • Chalkboard with Arrows and Puffy Star by Freckled Fawn
  • ABC Washi by Studio Calico (Double Scoop Scrapbook Kit)
  • Arrow & Geotag Chipboard Shapes Stickers by Studio Calico
  • Hummingbird Collectibles by Kaiser Craft
  • Pretty Party Border Stickers by Crate Paper

Wednesday, October 2, 2013

Journey

Happy October folks! Can someone tell me where has September gone to? I don't quite remember living through that month.. 

Okay, back to scrappy goodness.

I did a few layouts in the last couple of weeks thanks to the Art+Science Scrapbook Workshop by Big Picture Classes. Loving every bit of the challenges and it was fun, trying to stretch myself a little bit out of my comfort zone on every challenge. I think I'm a bit addicted to online craft workshops/classes, because there are a few more lined up waiting to be picked. I don't want to spend so much on online craft classes, so I will only choose ONE. Sigh.. 

HOWEVER, after all the grandma's story, I wish to tell you that this layout has nothing to do with any craft classes. I came up with the idea on my own, and I'm sorry I babbled so much. Now, some photos of the awesome layout I made.

Super {heart} the background paper!

Fuzzy cutting the chevron was a bit pain in the *someplace*, but it was worth it, loving the final look


not all who wonder are lost


This is a layout about all of my recent adventures, a summary on where I've been to. I put 6 months as the duration on the layout, but I just realized actually these trips happened within a 8 month period. Too late to change that now, so I'll just let it be. I love to travel and wish to see every beautiful corner of the world, and I'm grateful I've been to so many places in the last few months. My greatest travel adventure would be backpacking around Europe someday. =)

Supplies (Patterned Papers)
  • Jet Set, Urban Traveler by Simpler Stories
  • Away We Go by My Mind's Eye
  • XSC-050 by Basic Grey for Studio Calico
Supplies (Letters)
  • Rub On Alphas by Heidi Grace
  • Urban Traveler Chipboard Stickers by Simple Stories
  • Swagger & Trendsetter Sticker Fundamentals by Fancy Pants
  • Honey Sticky Keys by October Afternoon
  • Kut Kraft Alphabeans by Jilibean Soup
Supplies (Embellies)
  • Doodle Dimensional Stickers by Amy Tangerine
  • Enjoy the Ride Sticker Accents by Echo Park
  • Mustard Color Shine by Heidi Swapp
  • Boarding Pass Chip 'n Stick by October Afternoon
  • Geotag Chipboard Shapes &Gold Polka Dot Washi by Studio Calico
  • Urban Traveler Chipboard Stickers by Simple Stories